In this tutorial, we'll see how to divide an image in Photoshop in several Polaroids Output image is our right woman with the headphones. Here is the main image-

1.We begin by opening our desire to picture in Adobe Photoshop image (Ctrl + O) and to duplicating the Background layer security again with Ctrl + J.
2.with the rectangle tool (U), we create a square, hold down the Shift key, which gets the color # 7e7e7e.

3. The level "Form 1" we now use Ctrl + J to duplicate and transform the newly created layer with Ctrl + T. For this we enlarge with the Shift and Alt keys out the shape from the middle and then pull the bottom edge a little after below. Then we change by double-clicking the layer thumbnail or the foreground color to white and move this new layer below our level, "Form 1".

4. By holding the Shift key, we mark both rotate and move this Polaroid levels and using Ctrl + T in the desired position.

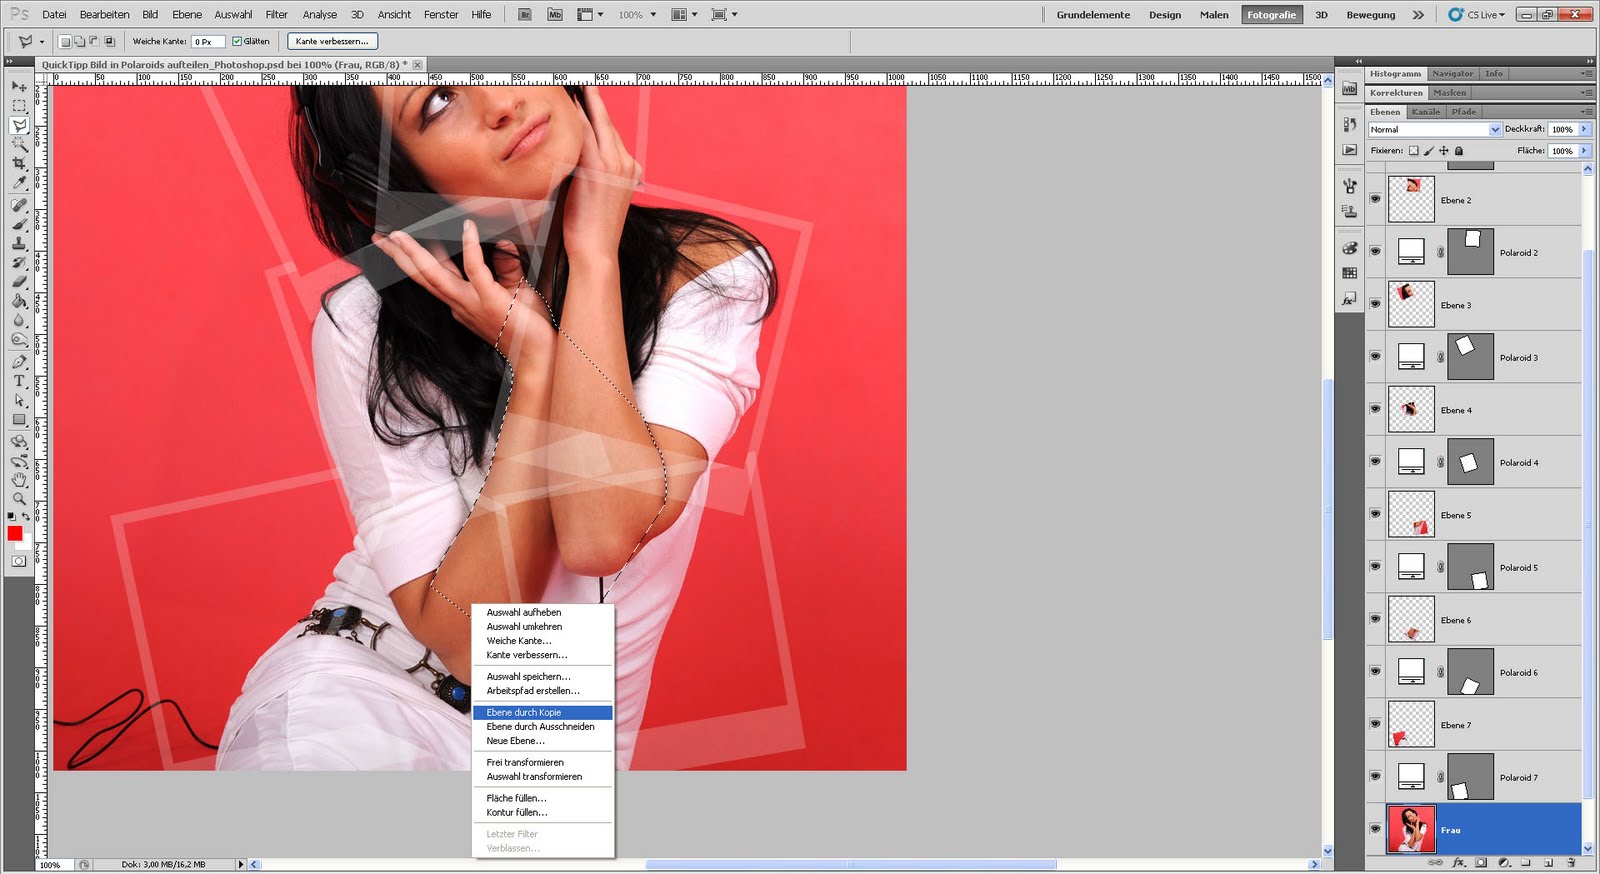
5. We now turn our duplicate background layer "woman" and then hold down the Ctrl key and click the red box layer mask of layer "Shape 1" to select it. In this selection we click with the lasso tool (L) with the right and choose "Layer via Copy". Now we push the level of our newly created layer "Shape 1" and you're almost finished our first Polaroid. We need to connect only the new level and the level of "Polaroid 1" (select both layers by holding down the Ctrl key - connect> Layers -> right click).

6. Polaroid both levels, we again duplicate (both highlight -> right click "duplicate layers" on) and repeat steps 4 and 5 until the whole picture (or the desired image detail) is covered with Polaroids. It can be cleared each time after completion of step 6, the level (or the copy of the plane) "Form 1", since these are only used for selection

7. Every Polaroid we have therefore assigned its own individual image. Now we still turn in the arms of a little trick. For this purpose we mark by holding down the Shift key all Polaroid shape layers and reduce its opacity to 20%. With the Lasso Tool (L), we drive around in our level, "Mrs." now the image parts that are to be placed over the Polaroids, so it seems as if his arms would reach out from the image.

8. The by now "Layer via Copy" newly formed entirely in the plane, we move up the Layers dialog. Minor rework on this level we can use the eraser tool (Shift + E) or with a layer mask. Then we set the opacity levels of the Polaroid back to 100%.

9. Now we select the top polaroid layer and add this on Layer -> Layer Style -> Drop Shadow to Shadow (Opacity: 50%, Angle: 120 °, distance: 10 Px, trapping: 15% Size: 25 Px). Then we click with the right to choose this level, "Copy Layer Style", highlight by holding down the Ctrl key and click all the other Polaroid levels right there again with "Paste Layer Style" to get so all levels Polaroid a drop shadow.

10. Finally, we add the image nor any background in the Layers dialog and push it over the plain "woman."

Here is the final result

1.We begin by opening our desire to picture in Adobe Photoshop image (Ctrl + O) and to duplicating the Background layer security again with Ctrl + J.

2.with the rectangle tool (U), we create a square, hold down the Shift key, which gets the color # 7e7e7e.

3. The level "Form 1" we now use Ctrl + J to duplicate and transform the newly created layer with Ctrl + T. For this we enlarge with the Shift and Alt keys out the shape from the middle and then pull the bottom edge a little after below. Then we change by double-clicking the layer thumbnail or the foreground color to white and move this new layer below our level, "Form 1".

4. By holding the Shift key, we mark both rotate and move this Polaroid levels and using Ctrl + T in the desired position.

5. We now turn our duplicate background layer "woman" and then hold down the Ctrl key and click the red box layer mask of layer "Shape 1" to select it. In this selection we click with the lasso tool (L) with the right and choose "Layer via Copy". Now we push the level of our newly created layer "Shape 1" and you're almost finished our first Polaroid. We need to connect only the new level and the level of "Polaroid 1" (select both layers by holding down the Ctrl key - connect> Layers -> right click).

6. Polaroid both levels, we again duplicate (both highlight -> right click "duplicate layers" on) and repeat steps 4 and 5 until the whole picture (or the desired image detail) is covered with Polaroids. It can be cleared each time after completion of step 6, the level (or the copy of the plane) "Form 1", since these are only used for selection

7. Every Polaroid we have therefore assigned its own individual image. Now we still turn in the arms of a little trick. For this purpose we mark by holding down the Shift key all Polaroid shape layers and reduce its opacity to 20%. With the Lasso Tool (L), we drive around in our level, "Mrs." now the image parts that are to be placed over the Polaroids, so it seems as if his arms would reach out from the image.
8. The by now "Layer via Copy" newly formed entirely in the plane, we move up the Layers dialog. Minor rework on this level we can use the eraser tool (Shift + E) or with a layer mask. Then we set the opacity levels of the Polaroid back to 100%.

9. Now we select the top polaroid layer and add this on Layer -> Layer Style -> Drop Shadow to Shadow (Opacity: 50%, Angle: 120 °, distance: 10 Px, trapping: 15% Size: 25 Px). Then we click with the right to choose this level, "Copy Layer Style", highlight by holding down the Ctrl key and click all the other Polaroid levels right there again with "Paste Layer Style" to get so all levels Polaroid a drop shadow.

10. Finally, we add the image nor any background in the Layers dialog and push it over the plain "woman."

Here is the final result

No comments:
Post a Comment