This tutorial will show you the crystal ball look . What will the world of a glass ball from behind? As you yourself can create these effects would, now I show - with Adobe Photoshop, we are digital crystal ball in front of a picture and share ours.

1. We open the desired background image in Adobe Photoshop (Ctrl + O) to create us a new layer (Shift + Ctrl + N) and move into this while holding down the Shift key a circular selection with the Elliptical Marquee tool (M) for our subject.

2. With the Paint Bucket tool (G), we fill our selection with the foreground color # E4E1CF. Use Ctrl + D we raise then selection again.

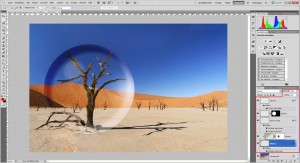
3. Our level 1, we now add double the level a layer style added. We use a white inner shadow with these settings:

1. We open the desired background image in Adobe Photoshop (Ctrl + O) to create us a new layer (Shift + Ctrl + N) and move into this while holding down the Shift key a circular selection with the Elliptical Marquee tool (M) for our subject.

2. With the Paint Bucket tool (G), we fill our selection with the foreground color # E4E1CF. Use Ctrl + D we raise then selection again.
3. Our level 1, we now add double the level a layer style added. We use a white inner shadow with these settings:
- Blend: bright color
- Opacity: 50%
- Angle: -50 °
- Distance: 50 px
- Choke: 50%
- Size: 75 px
The resulting image should look something like this. The values ??for distance, under-filling and size can vary depending on image size and size of the elliptical marquee tool. The above values ??are thus to be understood only as guidelines.

4. We create another new layer (Shift + Ctrl + N / "level 2") link and then pressing Alt + Ctrl + G to the underlying level 1 Then we fill the layer 2 in the direction with a linear reverse the course of the step 2 set the foreground color to background color E4E1CF # # AFADA5.

5. Level 2 now gets a layer mask (Layer -> Layer Mask -> Reveal All), which we with a radial gradient black to transparent in the direction of fill.

6. We now duplicate our level 1 (click on that layer and then Ctrl + J) and then edit the shadow to the inside of the newly created level. If the link between the first and second levels have solved the duplication, we can always use Alt + Ctrl + G to activate.

7. Now we process more the inner glow of the level 1 copy.

8. Now comes the Brush tool (B) in a new layer (Layer 3) is used. We choose 360 px large, white, soft brush from one side and click once to the right edge of our glass ball. Then we click, Ctrl-click the layer thumbnail of our level 1 and therefore select the crystal ball only. Then we click with activated level 3 on the symbol to add a layer mask and it will get a layer mask to our chosen field applied only. After that, we still reduce the opacity of the layer 3 to 70%.

9. In a new layer (Layer 4) are enclosed with the Brush tool (B) a white, 70% hard and 150 px large point added. This level 4, we bear a note to the outside in the layer style.

10. We now check whether the levels really are all disposed to seeing here in the order and then have some changes in the levels 1, 1 and 4, make a copy, so that really made the circuit is a crystal ball.
Level 1: Opacity to 80% and fill to 0%
Layer 1 copy: Opacity to 80% and fill to 0%
Level 4: Opacity to 20% and remains at 100% filling
11. As our floating glass ball course, a shadow must generate in order to appear realistic, we create a new layer and move them between our level 1 and the background layer. Then we click on an active level 5 while holding down the Ctrl key to select Ebenenminatur Level 1 and thus the filling of the level 1 only. This selection we fill level 5 in the arrow direction with a radial gradient from transparent to black.

12. This choice we have to use Ctrl + T to transform free . To this end we lift first with Ctrl + D to reduce the selection, our level and push it slightly to the right until the following picture arises in. The changes will be confirmed by clicking the checkbox at the top of the control bar.

13. Now we lower the opacity level 5 to 40% and change the layer mode to Hard Light. Then we turn to that level yet the Gaussian Blur (Filter -> Blur -> Gaussian Blur) Radius of 30 px with a.

14. In the penultimate step, we select the background layer and hit Ctrl-click the layer thumbnail of the level 1 Then we apply this selection is a distortion to Filter -> Bulge -> Distort with 100% strength.

15. In the last step we lift with Ctrl + D to this selection. Since I the shadow inside the glass ball a little too much appears, I retouch soft in the level 5 with a 20%, 150 px large eraser (Shift + E) with 20% covering this flaw is still and know our virtual glass bead finish.

I hope you've enjoyed this

6. We now duplicate our level 1 (click on that layer and then Ctrl + J) and then edit the shadow to the inside of the newly created level. If the link between the first and second levels have solved the duplication, we can always use Alt + Ctrl + G to activate.
7. Now we process more the inner glow of the level 1 copy.
8. Now comes the Brush tool (B) in a new layer (Layer 3) is used. We choose 360 px large, white, soft brush from one side and click once to the right edge of our glass ball. Then we click, Ctrl-click the layer thumbnail of our level 1 and therefore select the crystal ball only. Then we click with activated level 3 on the symbol to add a layer mask and it will get a layer mask to our chosen field applied only. After that, we still reduce the opacity of the layer 3 to 70%.
9. In a new layer (Layer 4) are enclosed with the Brush tool (B) a white, 70% hard and 150 px large point added. This level 4, we bear a note to the outside in the layer style.
10. We now check whether the levels really are all disposed to seeing here in the order and then have some changes in the levels 1, 1 and 4, make a copy, so that really made the circuit is a crystal ball.
Level 1: Opacity to 80% and fill to 0%
Layer 1 copy: Opacity to 80% and fill to 0%
Level 4: Opacity to 20% and remains at 100% filling
11. As our floating glass ball course, a shadow must generate in order to appear realistic, we create a new layer and move them between our level 1 and the background layer. Then we click on an active level 5 while holding down the Ctrl key to select Ebenenminatur Level 1 and thus the filling of the level 1 only. This selection we fill level 5 in the arrow direction with a radial gradient from transparent to black.
12. This choice we have to use Ctrl + T to transform free . To this end we lift first with Ctrl + D to reduce the selection, our level and push it slightly to the right until the following picture arises in. The changes will be confirmed by clicking the checkbox at the top of the control bar.

13. Now we lower the opacity level 5 to 40% and change the layer mode to Hard Light. Then we turn to that level yet the Gaussian Blur (Filter -> Blur -> Gaussian Blur) Radius of 30 px with a.
14. In the penultimate step, we select the background layer and hit Ctrl-click the layer thumbnail of the level 1 Then we apply this selection is a distortion to Filter -> Bulge -> Distort with 100% strength.
15. In the last step we lift with Ctrl + D to this selection. Since I the shadow inside the glass ball a little too much appears, I retouch soft in the level 5 with a 20%, 150 px large eraser (Shift + E) with 20% covering this flaw is still and know our virtual glass bead finish.
I hope you've enjoyed this
No comments:
Post a Comment