Christmas is not too far away and it's time to send out a few greeting cards. How to create such a self-designed card in Adobe Photoshop, will be shown here.
1. First we open Photoshop and create us about Ctrl + N a new document. This has the dimensions 210 x 148 mm, 300 dpi resolution, CMYK color mode and a transparent background. We can of course also the template A5 - 1-sided - landscape.psd here to download. Tips and tricks for using our artwork you will find the way here .

2. we use either the templates or we need to trim with power lines, which we pulled out the ruler, in 2 mm - the distance set by the document edge itself. About View -> Guides block we prevent the guides are moved accidentally.

3. we now consider ourselves to the rectangle tool and a rectangle with the color of the paint bucket, one black. With Ctrl + J to duplicate this layer and we color the new layer with a wine red (872D2A) one.

4. In the top level, we are writing a layer mask by clicking on the red icon marked down in the Layers panel. With the Gradient tool , we move from the center outward radial one sale from black to transparent and reduce the opacity of this layer to 70%

5. In a new layer ( Ctrl + Shift + N ), we create with the rectangle tool in the black rectangle and then lower the Opacity of this layer to 40% .

6. Now we take the rounded corners tool at hand and create with a radius of 10 px , a white rectangle.

7. we duplicate this now with Ctrl + J 3 times, so we now have a total of four rectangles. About Ctrl + T , we call the free transform tool to rotate and each rectangle while holding down the Shift key , and this figure emerge:

8. By holding down the Ctrl key , we now highlight all four rectangular planes and add them together into one layer.

9. We duplicate this layer again with Ctrl + J and Ctrl + T , we reduce the new layer and rotate it a little, so that results in something like this figure:

10. From the toolbar, we call the Custom Shape tool to create us and hold down the Shift key a five-pointed star. This we call as shown in the image on:

11. With the Direct Selection tool and hold down the Shift key , we select the anchor points shown here:

12. Over Edit -> path , we use free transform the vertical scale to 20% down . It must be decoupled from the anchor symbol.

13. This star is then with the Move tool is pushed over the previously created two Schneestern levels. Now we duplicate the star - Level 2-times turn again to new levels, a little to unite and to one every 5 levels.

14. In the next step we create first a new layer and call this "tree". The tree we create with the Line tool . With the Direct Selection tool , this path still being processed. The path may now several levels for the tree to reduce and, if desired, nor Ctrl + T to free transform.

15. The snow yesterday, we now duplicate on several occasions and arrange it with the Move tool (available in several different sizes to edit by pressing Ctrl + T ) to within the tree, to about the following picture emerges:

16. Well to reduce all the stars on a snow level, and this duplicate ( Ctrl + J ). The level "tree" can now be deleted, because she has only served as an auxiliary level. The duplicate layer "soft snow star" now on Filter -> Gaussian Blur -> Blur blur with a radius of 10 px.

17. The two snow-star levels , we now add back together to form a layer. This new level, we again duplicate ( Ctrl + J ) and reflect this on Edit -> Transform -> Flip Vertical Flip. Then we move the layer with the Move tool.

18. In the new level, "Snow Star copy", we add a layer mask back on and fill it with a linear gradient from black to transparent. Then we reduce the opacity of this layer to 80%.

19. With a hard, white brush up in the new layer "brush" creates a texture. We vary the size of the brush several times and finally set the opacity of this layer to 30% down and change the layer mode to "Soft Light" from.

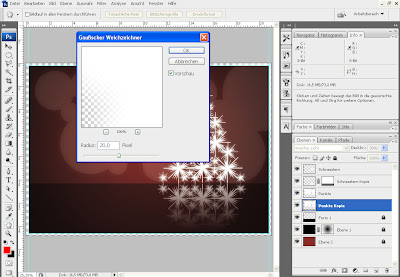
20. The plane with the points we duplicate again and again turn to the new layer a Gaussian Blur with a radius of 20 px on.
21. Let's add it all in a new layer add a little more snow in which we have a hard white brush 10 px Radiu s apply. At this level, "Snow", we then apply the filter Motion blur (-50 °, 10 px) on. This is like the Gaussian Blur with the Blur Filter to find.

22. Next, we create once again a new layer e, call these "corners" , the level push to the top of the Layers palette and create in this layer with the rectangle tool again, a black rectangle. Then we apply the brush tool So on to the newly created layer mask, which leaves only the black corners. The opacity of this layer , we reduce to 80% .

23. We will now create a new adjustment layer for Hue / Saturation ( color: -5 / Saturation: +25 ).

24. In another Curves adjustment layer, we modify the curve as follows:

25. Finally, insert the text you want, hide the guides again and finished our greeting card.

1. First we open Photoshop and create us about Ctrl + N a new document. This has the dimensions 210 x 148 mm, 300 dpi resolution, CMYK color mode and a transparent background. We can of course also the template A5 - 1-sided - landscape.psd here to download. Tips and tricks for using our artwork you will find the way here .

2. we use either the templates or we need to trim with power lines, which we pulled out the ruler, in 2 mm - the distance set by the document edge itself. About View -> Guides block we prevent the guides are moved accidentally.

3. we now consider ourselves to the rectangle tool and a rectangle with the color of the paint bucket, one black. With Ctrl + J to duplicate this layer and we color the new layer with a wine red (872D2A) one.

4. In the top level, we are writing a layer mask by clicking on the red icon marked down in the Layers panel. With the Gradient tool , we move from the center outward radial one sale from black to transparent and reduce the opacity of this layer to 70%

5. In a new layer ( Ctrl + Shift + N ), we create with the rectangle tool in the black rectangle and then lower the Opacity of this layer to 40% .

6. Now we take the rounded corners tool at hand and create with a radius of 10 px , a white rectangle.

7. we duplicate this now with Ctrl + J 3 times, so we now have a total of four rectangles. About Ctrl + T , we call the free transform tool to rotate and each rectangle while holding down the Shift key , and this figure emerge:

8. By holding down the Ctrl key , we now highlight all four rectangular planes and add them together into one layer.

9. We duplicate this layer again with Ctrl + J and Ctrl + T , we reduce the new layer and rotate it a little, so that results in something like this figure:

10. From the toolbar, we call the Custom Shape tool to create us and hold down the Shift key a five-pointed star. This we call as shown in the image on:

11. With the Direct Selection tool and hold down the Shift key , we select the anchor points shown here:

12. Over Edit -> path , we use free transform the vertical scale to 20% down . It must be decoupled from the anchor symbol.

13. This star is then with the Move tool is pushed over the previously created two Schneestern levels. Now we duplicate the star - Level 2-times turn again to new levels, a little to unite and to one every 5 levels.

14. In the next step we create first a new layer and call this "tree". The tree we create with the Line tool . With the Direct Selection tool , this path still being processed. The path may now several levels for the tree to reduce and, if desired, nor Ctrl + T to free transform.

15. The snow yesterday, we now duplicate on several occasions and arrange it with the Move tool (available in several different sizes to edit by pressing Ctrl + T ) to within the tree, to about the following picture emerges:

16. Well to reduce all the stars on a snow level, and this duplicate ( Ctrl + J ). The level "tree" can now be deleted, because she has only served as an auxiliary level. The duplicate layer "soft snow star" now on Filter -> Gaussian Blur -> Blur blur with a radius of 10 px.

17. The two snow-star levels , we now add back together to form a layer. This new level, we again duplicate ( Ctrl + J ) and reflect this on Edit -> Transform -> Flip Vertical Flip. Then we move the layer with the Move tool.

18. In the new level, "Snow Star copy", we add a layer mask back on and fill it with a linear gradient from black to transparent. Then we reduce the opacity of this layer to 80%.

19. With a hard, white brush up in the new layer "brush" creates a texture. We vary the size of the brush several times and finally set the opacity of this layer to 30% down and change the layer mode to "Soft Light" from.

20. The plane with the points we duplicate again and again turn to the new layer a Gaussian Blur with a radius of 20 px on.

21. Let's add it all in a new layer add a little more snow in which we have a hard white brush 10 px Radiu s apply. At this level, "Snow", we then apply the filter Motion blur (-50 °, 10 px) on. This is like the Gaussian Blur with the Blur Filter to find.

22. Next, we create once again a new layer e, call these "corners" , the level push to the top of the Layers palette and create in this layer with the rectangle tool again, a black rectangle. Then we apply the brush tool So on to the newly created layer mask, which leaves only the black corners. The opacity of this layer , we reduce to 80% .

23. We will now create a new adjustment layer for Hue / Saturation ( color: -5 / Saturation: +25 ).

24. In another Curves adjustment layer, we modify the curve as follows:

25. Finally, insert the text you want, hide the guides again and finished our greeting card.

No comments:
Post a Comment